Integrating Optimizely Full Stack with Episerver
Oct 22, 2020
 This is the first in a series of posts to describe how to use Episerver with Optimizely Full Stack targeted at Episerver implementors/developers. It is not intended to be a full depth dive into Optimizely and is intended to be an introductory set of posts on how to use Optimizely Full Stack with Episerver. This specific post covers:
- What is Optimizely Full Stack
- Episerver environment preparation
- Code required to connect Episerver to Optimizely Full Stack
Further posts in the series describe:
- Using Optimizely Full Stack in Episerver to experiment with a set of content changes in an Episerver Project
- Audience definition in Optimizely Full Stack based on user attributes from Episerver
What is Optimizely Full Stack?
As described by Optimizely, the Full Stack product allows users to "Experiment deep into your stack to create exceptional customer experiences on everything from search results and promos to recommendations and payment structures". Find out more here and also sign up for a free feature flag developer account: https://www.optimizely.com/platform/full-stack/.
From an Episerver perspective it can be seen as a remote feature flag and experimentation provider with the ability to turn features off, parameterise them, experiment with them, set up features for certain audiences and to record metrics and events.
Episerver environment preparation
The examples shown are all code so there are a couple of things required to prepare. Install the following Nuget packages in your target project:
- Optimizely SDK - https://www.nuget.org/packages/Optimizely.SDK/
- Episerver Labs Configuration Manager - https://nuget.episerver.com/package/?id=EPiServer.Labs.ConfigurationManager
- RestSharp - https://www.nuget.org/packages/RestSharp/
Code required to connect Episerver to Optimizely Full Stack
Next there is some code required in the Episerver project to connect to Optimizely Full Stack. Use the code from the "Core" folder as available here: https://github.com/episerver/foundation-experiments/tree/master/src/Foundation.Experiments/Core. Now we are ready to connect the Optimizely Full Stack instance with Episerver.
Configuring Optimizely Full Stack in Episerver admin mode
Configuration is achieved using a configuration class ExperimentationOptions decorated with the [Options] attribute (https://world.episerver.com/csclasslibraries/cms/EPiServer.ServiceLocation.OptionsAttribute?version=11) as seen here: ExperimentationOptions. It's possible to set the values yourself by getting this options class from the container and settings the value. Episerver v11.17+ also supports the ability to configure options through app settings as described here: https://world.episerver.com/documentation/Release-Notes/ReleaseNote/?releaseNoteId=CMS-15875.
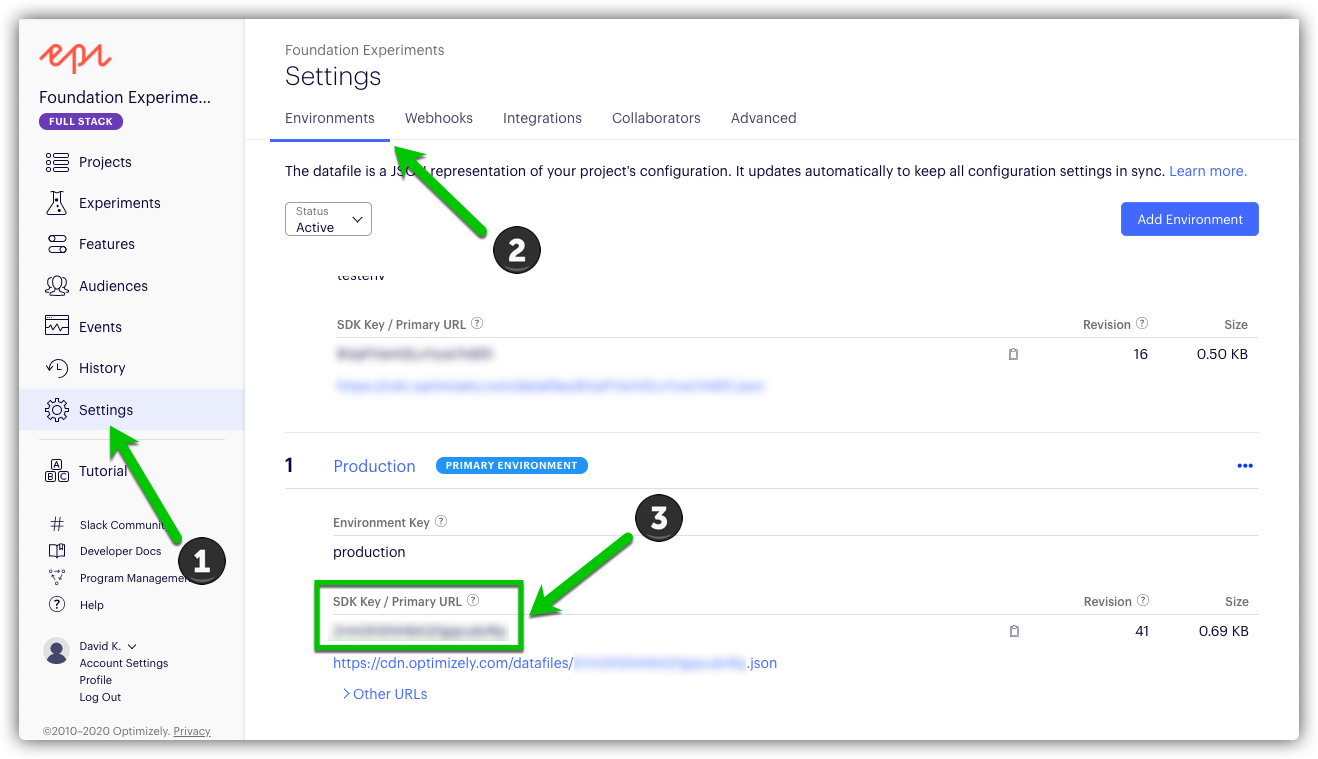
First of all find the find the Optimizely SDK key which can be found here in the Optimizely UI:

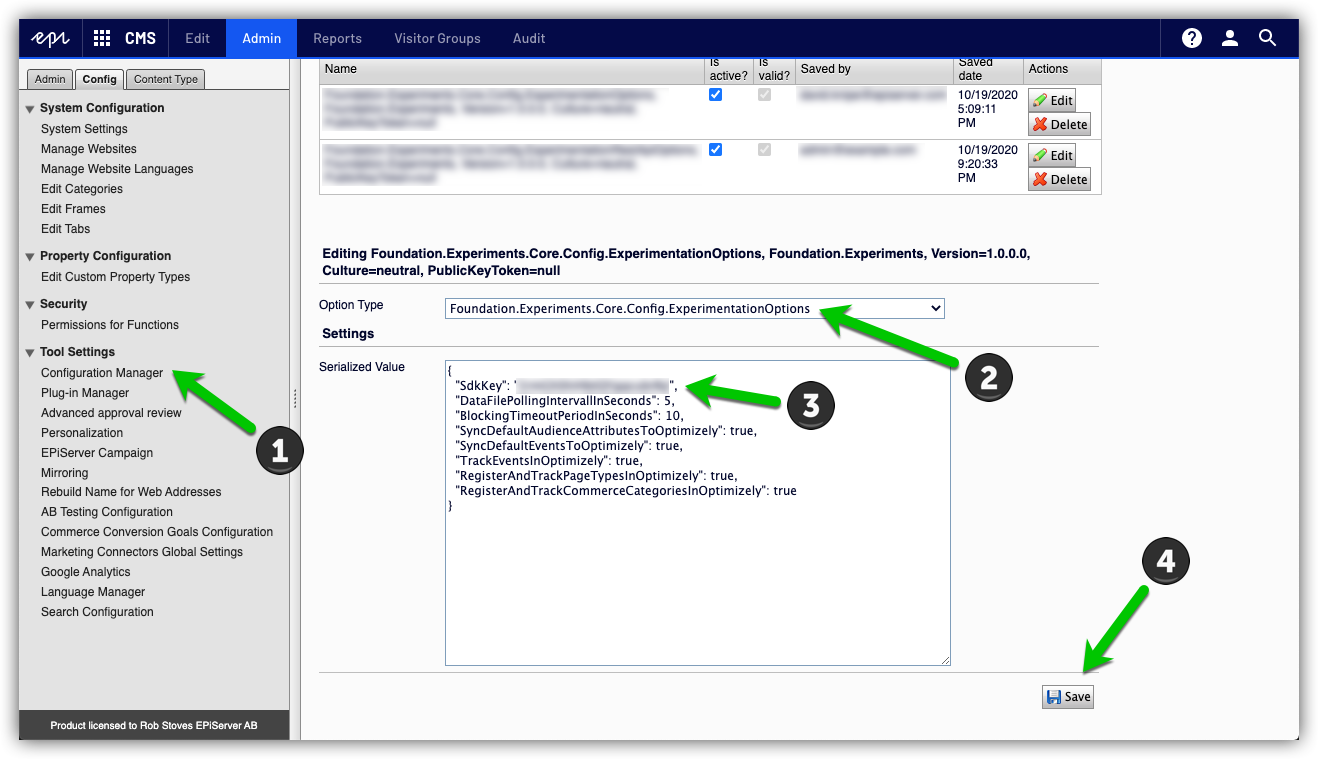
For convenience this post uses the Episerver Labs Configuration Manager as described here: https://world.episerver.com/blogs/grzegorz-wiechec/dates/2020/3/configuring-options-from-admin-mode/ to set the SDK key. Copy the SDK key value and in Admin mode > Tools > Config Manager select the "Foundation.Experimentation.Core.Config.ExperimentationOptions" class and enter the SDK key for the environment the Episerver instance should be connected to:

Conclusion
Now the infrastructure is in place to connect Episerver with Optimizely Full Stack and start to use some capabilities.
Read part 2: Using Optimizely Full Stack in Episerver to experiment with a set of content changes in a project.
Thanks to Patrik Fomin for assisting in putting the code together!